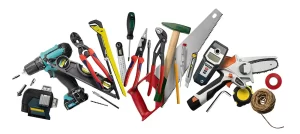
Basic Tools:
- Carpenter’s Square
- Levels (2)
- Drill with assorted size drill bits. (1/8″-1/4″).
- Drill with Phillips bit driver.
- The appropriate stainless-steel screws for attaching the cabinets to your wall.
- #8 x 1-1/4″ Stainless Steel Pan Head screws (to attach cabinets together).
- Clamps with protective rubber pads.
- Plastic shims.
- Tape measure.
- Saw (Circular or Table)
- Hammer
- Your base cabinets are shipped with wood blocks attached to the top of the cabinet box. These are used for shipping and to protect the cabinet.
- Set all your cabinets in place according to your cabinet layout. Set the cabinets on their tops facing the wall and remove all packaging.
- Insert the supplied leg-levelers in cabinet sockets. Do a rough leg-leveler adjustment for a leg height of 4-1/2″.
- Carefully flip the cabinets over (2 people recommended) to set them on their legs. Remove the protective wood blocks.
- We recommend that you take all doors off and remove all drawers before installation.
- Put them in a safe place away from the install site.
- Be sure to put them on the same spot they were removed from after cabinet installation.
Mark a level line from the center of the wall at 34-3/4″ high.
Most outside areas are slopped for drainage, so start with the cabinet at the highest point of the slope.
Set the first cabinet at that point adjusting the legs to set the top of the cabinet to 34-3/4″ high.
Be sure the cabinet is level from side to side, front to back and left to right. Use a carpenter’s square to ensure the cabinet is square.
Pre-drill at least 2-3/16″ holes in the cabinet back. More can be drilled if needed.
Attach the cabinet to the wall with the appropriate screws. (i.e., stain-less tap cons for block, stainless wood screws for wood).
Set the next cabinet in place and repeat the leveling process.
Align the 2 cabinet faces together flush and clamp the cabinets together. Be sure there are no gaps between the cabinets.
Pre-drill the second cabinet to the first with an 1/8″ drill bit at 1-1/4″ deep.
Try to put the screw where it is not seen, such as the top corner or behind a hinge.
Attach the 2 cabinets together with #8 x 1-1/4″ stainless pan head screws.
Repeat process until complete.
Cabinets can be centered on the wall and then the filler can be cut to fit the existing gap between the cabinet and the side wall if applicable.
We recommend using a filler at least 2″ wide to allow space for the door swing and drawer to open without contacting the side wall.
Double check that all cabinets are square, level, and plumb!
Grill cabinets come in a farm sink style construction.
The front panel is removable and used to trim out the face of the grill if necessary.
The panel behind the removable panel is cut to fit your grills insulated jacket.
Be sure to allow for the thickness of the countertop when cutting the panel.
If your grill liner comes with a flange, then it will sit on top of the countertop.
If your grill liner does not have a flange then you can use extra toe kick material, etc. to reinforce if from underneath.
Check with the manufacturer for proper installation.
There are 1-4 grill vents cut into the cabinet deck for ventilation depending on the size of your grill cabinet.
Whether you buy your grill from us or another source you must buy the insulated liner with it.
DO NOT INSTALL YOUR GRILL OR SIDE BURNER IN A CABINET WITHOUT THE INSULATED LINER!
Wall cabinets are installed much in the same way.
If you do have wall cabinets, it’s easier to install them first so you are not reaching over the base cabinets.
Use at least 4 attaching screws in the corners to secure the cabinets. More can be used if needed!
Make sure they stay square and will line up correctly with the base cabinets.
Cabinets can be cut for plumbing, gas and electric with a hole saw or paddle bit.
For larger cuts, you can use a jig saw.
Do not cut at corners or anywhere that will compromise the strength and integrity of the cabinet.
Toe kick is available in different sizes and designed to be cut to fit to the slope of your area.
After installing your cabinets, cut the toe kick to fit underneath the cabinets.
Mark the back of the toe kick where it meets the leg-leveler.
Install the black plate and the white clip and clip the toe kick to the leg leveler. It’s that easy!
After everything is installed and you are satisfied that you are done, you can put on the doors and drawers.
(Some people choose to leave them off until the tops are installed to minimize damage.)
Some minor adjusting of doors and drawers may be required due to shipping. If so do it now before putting on your handles or knobs.
Carefully install your chosen handles or knobs.
If you have any questions or concerns, please call us at 772-497-6570